
How to Fix Shaky Hands Photography: The Complete Guide to Sharp, Blur-Free Photos
Whether you’re shooting with a smartphone or a professional DSLR, camera shake is one of the most frustrating problems in photography. This guide covers everything you need — from camera settings to expert handheld techniques — so you can stop missing shots and start capturing crisp, professional-looking images.
What Is Shaky Hands Photography — And Why Does It Ruin Your Shots?
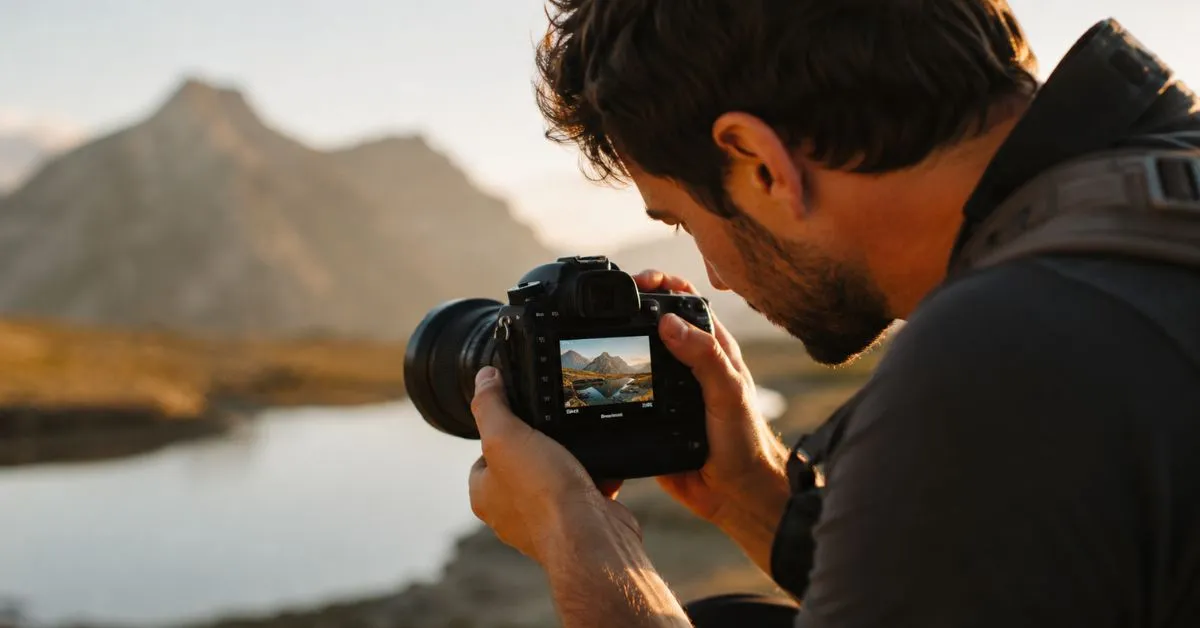
Picture this: You’re at a concert, a golden-hour sunset, or your kid’s birthday party. You raise your camera, frame the perfect shot, press the button — and the photo comes out blurry. Not because your subject moved. Because your hands did.
This is shaky hands photography, and it’s responsible for a huge percentage of blurry, soft, or unusable photos taken every single day. The technical term is camera shake, and it happens when your camera moves during the exposure — even slightly. That movement gets recorded as blur across the entire image.
Here’s what makes it tricky: your hands never truly stop moving. There’s always a tiny tremor, a micro-vibration from your heartbeat, a breath, a muscle twitch. Under good lighting conditions, this barely matters. But drop the light levels, extend the shutter speed, or zoom in with a telephoto lens, and suddenly that invisible shake turns into a visibly ruined photo.
Understanding why blur happens is the first step to fixing it permanently.
Main Causes of Shaky Photography
1. Slow Shutter Speed
This is the number one culprit. Your camera’s shutter controls how long the sensor is exposed to light. A fast shutter speed (like 1/1000s) freezes everything — including hand movement. A slow shutter speed (like 1/30s or slower) means any motion during that window gets recorded as blur.
The classic rule is the reciprocal rule: your shutter speed should be at least 1/(focal length). If you’re shooting at 50mm, use at least 1/50s. At 200mm? You need at least 1/200s.
2. Poor Grip and Camera Hold
Most beginners hold their camera like they’re afraid to damage it — light, hesitant, with elbows out. This is exactly the wrong approach. A loose grip creates wobble. A proper, firm grip creates a stable shooting platform.
3. Low Light Conditions
In dim environments, your camera slows the shutter speed to gather more light. More time = more opportunity for your hands to introduce blur. This is why indoor photos and night shots are so much harder to keep sharp when shooting handheld.
4. Digital Zoom
Using digital zoom on a smartphone doesn’t actually zoom — it crops and enlarges the image. Any camera shake gets amplified along with the crop, making blur far more visible. Avoid digital zoom whenever possible.
5. Heavy Telephoto Lenses
Long lenses magnify not just your subject but every tiny movement too. A 400mm lens makes camera shake roughly 8x more visible than a 50mm lens. The longer the lens, the more stabilization you need.
6. Improper Body Posture
Standing with your feet close together, holding your arms away from your body, or shooting while on the move all create instability. Your body is your first tripod — use it properly.
7. Motion Blur vs. Focus Blur
It’s worth clarifying: motion blur (from camera shake or a moving subject) looks like streaks or directional smearing across the image. Focus blur (from incorrect autofocus or a shallow depth of field) looks like soft, smooth out-of-focus areas. Camera shake causes motion blur, and the solutions are different from fixing focus issues.
Best Ways to Fix Shaky Hands Photography
Use a Faster Shutter Speed
The single most effective fix. Bump your shutter speed up. In bright daylight, 1/500s or faster gives you tons of margin. In lower light, stay above 1/focal length as a minimum. If your camera is in Auto mode, switch to Shutter Priority (Tv/S) mode and set the speed manually.
Enable Image Stabilization
Most modern cameras and smartphones have some form of image stabilization. Make sure it’s turned ON. There are two main types:
- OIS (Optical Image Stabilization): Physical lens elements or sensor shifts to compensate for movement. More effective, especially in low light.
- EIS (Electronic Image Stabilization): Software crops and shifts the frame digitally. Works well for video but reduces field of view slightly.
For cameras, look for IBIS (In-Body Image Stabilization) — Sony, Fujifilm, Olympus, and Nikon all offer this on many bodies. It works with any lens, including old manual ones.
Master the Correct Camera Holding Technique
This alone will eliminate a huge portion of your blur issues:
- Hold the camera with your right hand firmly gripping the grip, index finger on the shutter.
- Use your left hand under the lens (not on the side) to support and stabilize the weight.
- Tuck both elbows tightly into your chest — this turns your arms into a human tripod.
- Stand with feet shoulder-width apart, one foot slightly forward.
- Press the viewfinder to your forehead — this creates a third point of contact and dramatically increases stability.
Use Your Breathing Like a Sniper
Professional photographers — and snipers — both know this trick: exhale slowly, then press the shutter at the natural pause at the bottom of your breath. This is the moment your body is most still. Practice this until it becomes automatic.
Brace Against Solid Objects
No tripod? Use what’s around you. A wall, a doorframe, a tree, a car roof, a fence post — pressing your body or camera against any solid object dramatically reduces camera shake. Lean your back against a wall and use your knees as a rest for shooting downward.
Use Burst Mode
Burst mode fires multiple shots in quick succession. Even if the first frame catches you mid-breath or mid-twitch, there’s a much better chance one frame in the burst lands sharp. Review the burst afterward and keep the sharpest frame.
Use Your Camera Strap Correctly
Loop the strap around your wrist and create tension by pulling the camera forward while keeping the strap taut against your arm. This tension stabilizes the camera from a third direction and prevents accidental drops. It sounds minor — but it genuinely helps.
Smartphone Photography Solutions
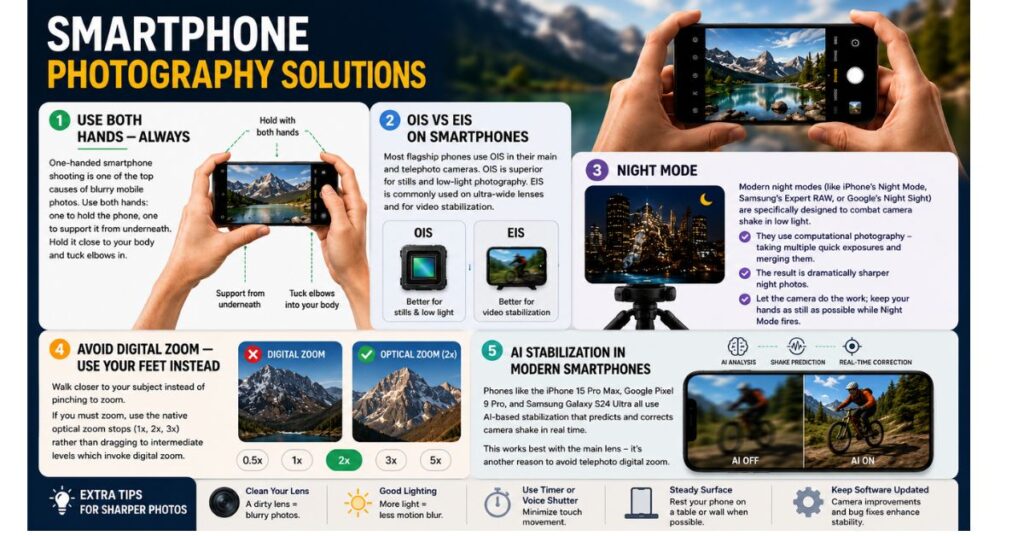
Use Both Hands — Always
One-handed smartphone shooting is one of the top causes of blurry mobile photos. Use both hands: one to hold the phone, one to support it from underneath. Hold it close to your body and tuck elbows in.
OIS vs EIS on Smartphones
Most flagship phones (iPhone 15 Pro, Samsung Galaxy S24, Google Pixel 9) use OIS in their main and telephoto cameras. OIS is superior for stills and low-light photography. EIS is commonly used on ultra-wide lenses and for video stabilization.
Night Mode
Modern night modes (like iPhone’s Night Mode, Samsung’s Expert RAW, or Google’s Night Sight) are specifically designed to combat camera shake in low light. They use computational photography — taking multiple quick exposures and merging them — rather than a single long exposure. The result is dramatically sharper night photos. Let the camera do the work; keep your hands as still as possible while Night Mode fires.
Avoid Digital Zoom — Use Your Feet Instead
Walk closer to your subject instead of pinching to zoom. If you must zoom, use the native optical zoom stops (1x, 2x, 3x) rather than dragging to intermediate levels which invoke digital zoom.
AI Stabilization in Modern Smartphones
Phones like the iPhone 15 Pro Max, Google Pixel 9 Pro, and Samsung Galaxy S24 Ultra all use AI-based stabilization that predicts and corrects camera shake in real time. This works best with the main lens — it’s another reason to avoid telephoto digital zoom.
Best Camera Apps for Stability
| App | Platform | Key Feature |
|---|---|---|
| ProCamera | iOS | Full manual control, burst mode |
| Camera FV-5 | Android | Manual shutter speed control |
| Moment Pro | iOS/Android | Full manual, RAW shooting |
| Halide | iOS | Excellent focus lock & RAW |
| Open Camera | Android | Free, full manual controls |
DSLR & Mirrorless Camera Solutions
The Reciprocal Rule (and When to Ignore It)
The standard rule: shutter speed = 1/focal length. At 85mm, use 1/85s (round up to 1/100s). However, with IBIS or lens stabilization, you can often shoot 3–5 stops slower than the reciprocal rule. That means hand-holding at 1/10s with a 100mm lens becomes viable.
In-Body Image Stabilization (IBIS) Explained
IBIS physically moves the camera sensor to counteract your hand movement. Sony’s latest IBIS systems claim up to 8 stops of compensation. In practice, 4–5 stops is realistic for stills. This is game-changing technology for low-light handheld photography.
Lens Stabilization Systems
Many telephoto and zoom lenses include optical stabilization independent of the camera body. When combined with IBIS (on compatible cameras), the two systems work together — called Dual IS (on Panasonic) or Synchro IS (on other brands) — for maximum effectiveness.
Autofocus Settings for Sharp Images
Camera shake ruins sharpness, but so does missed focus. For handheld photography:
- Use Eye AF or Face Detection AF where available — it tracks subjects automatically.
- In low light, use AF-assist beam or switch to manual focus with focus peaking.
- For moving subjects, use Continuous AF (AF-C) so the camera tracks motion in real time.
Tripods vs. Monopods
| Feature | Tripod | Monopod |
|---|---|---|
| Stability | Maximum | Good |
| Speed of Use | Slow to set up | Fast |
| Portability | Bulky | Compact |
| Best For | Long exposures, landscapes | Sports, wildlife, events |
| Works in Crowds | No | Yes |
Remote Shutter Techniques
Pressing the shutter button physically introduces vibration. For maximum sharpness (especially on tripods), use:
- 2-second self-timer: Press, let go, let vibration settle, camera fires.
- Remote shutter release: Wired or wireless, triggers shutter without touching camera.
- Smartphone app control: Most mirrorless cameras can be triggered via Bluetooth from an app.
Best Camera Settings for Sharp Photos
Recommended Settings by Situation
| Situation | Shutter Speed | ISO | Aperture |
|---|---|---|---|
| Bright daylight | 1/500s or faster | 100–200 | f/8 |
| Overcast/shade | 1/250s | 400–800 | f/5.6 |
| Indoor daylight | 1/125s | 800–1600 | f/4 |
| Indoor low light | 1/60s–1/100s | 1600–3200 | f/2.8 or wider |
| Sports/action | 1/1000s or faster | Auto | f/4–f/5.6 |
| Wildlife (handheld) | 1/500s–1/1000s | Auto | f/5.6 |
| Night handheld | 1/focal length minimum | 3200–6400 | Widest available |
Pro tip: Enable Auto ISO with a minimum shutter speed set. This tells the camera: “Never let shutter speed drop below X — compensate with ISO instead.” This keeps your images sharp and just adds a little grain, which is far better than blur.
Accessories That Help Reduce Camera Shake
Tripods
The gold standard. For landscape, long exposure, and studio work, a tripod eliminates all camera shake completely. Look for carbon fiber models for travel (lightweight, rigid) and ballheads for quick composition adjustments.
Gimbals
Motorized stabilizers that actively counteract movement in real time. Ideal for video and vlogging. Popular options: DJI OM 6 (smartphones), DJI RS 3 (mirrorless/DSLR). For photographers doing walkaround shooting, a gimbal can help with stills too.
Monopods
One-legged supports that are faster to use than tripods. Excellent for sports, events, and wildlife where you need to move quickly but still want extra support for heavy telephoto lenses.
Camera Cages & Grip Extenders
Cage systems (popular with videographers) add grip points to cameras that feel small or awkward. Extra grip = more stable hold. For DSLRs and mirrorless bodies, a battery grip adds physical size and a second shutter button for portrait orientation — both improve stability.
Beanbags
Underrated and inexpensive. A beanbag can be placed on a car window, wall, or fence and your camera rests in it. Perfect for wildlife photographers shooting from vehicles.
Lens Support Straps
Products like the BlackRapid lens hanger keep heavy telephoto lenses supported from your shoulder, reducing fatigue (which causes shake) during long shoots.
AI Tools and Software to Fix Blurry Photos
Sometimes, despite your best efforts, a photo comes back soft. Here are the best tools to rescue it in post-processing:
Adobe Lightroom — Enhance Sharpness
Lightroom’s AI Denoise and Sharpening tools (under the Detail panel) can recover texture and fine detail lost to slight camera shake. It won’t fix severe blur, but mild softness responds very well. Use Masking to sharpen only the subject, not the background.
Adobe Photoshop — Shake Reduction Filter
Photoshop has a dedicated Shake Reduction filter (Filter > Sharpen > Shake Reduction). It analyzes the blur pattern and attempts to reverse it. Results vary — it works best on mild, directional motion blur from camera shake, less well on complex multi-directional blur.
Topaz Photo AI
Currently the best AI photo sharpening tool available. Topaz Photo AI detects blur type automatically and applies targeted corrections. It can genuinely rescue photos that Photoshop and Lightroom cannot. The Sharpen and Motion Blur recovery modes are impressive, especially for slightly blurry portraits and wildlife shots.
Luminar Neo
Offers AI-powered sharpening with a simple interface. Good results for portrait photographers; slightly less powerful than Topaz for severe blur.
ON1 Photo RAW
Includes a strong Unsharp Mask and AI-powered sharpening. Good alternative if you already use ON1 for editing.
Important caveat: Software can enhance and recover mild blur, but it cannot add detail that was never captured. A severely motion-blurred image will never look tack-sharp in post. Prevention — proper technique and camera settings — is always better than the cure.
Common Photography Mistakes Beginners Make
Shooting One-Handed
The most common mistake. Even with OIS, one-handed shooting dramatically increases shake. Always use both hands.
Relying on Auto Mode Blindly
Auto mode will often choose a shutter speed that’s too slow in dim conditions, especially on entry-level cameras. Learn to override it with Shutter Priority or Manual mode.
Using Digital Zoom
Crops and amplifies both your subject and your camera shake. Avoid it. Walk closer, use optical zoom, or crop in post after capturing the full frame.
Shooting With Elbows Out
“Chicken wing” shooting technique is extremely common and extremely unstable. Tuck those elbows in.
Holding Their Breath (Instead of Exhaling)
Many beginners instinctively hold their breath to steady themselves. This actually increases muscle tension and increases the likelihood of a sharp jerk when the shutter fires. Exhale and shoot at the bottom of the breath instead.
Ignoring the Histogram and EXIF Data
After a blurry shot, check the EXIF data (shutter speed, ISO, focal length). This tells you exactly what settings caused the problem so you can adjust next time.
Expert Photography Tips
The Ninja Stance
Professional wildlife and sports photographers often use a low, wide stance — feet wider than shoulders, one knee almost down. This drops the center of gravity and creates an incredibly stable platform for handheld telephoto shooting.
The Wall Technique (Urban Photography)
In city environments, lean your back flat against a building wall. Keep your elbows pressed against your ribs. Now you have four points of contact instead of two — massive improvement in stability.
Pre-Focus and Wait
Rather than tracking a moving subject, focus on the spot where you know they’ll be (a finish line, a doorway, a perch a bird keeps returning to) and wait. When the subject enters the frame, fire. No tracking movement, less shake.
Shoot in Continuous Burst — Every Time
Professionals shooting important moments almost always use burst mode, not single-shot. Reviewing 10 frames and finding 2 perfect ones is infinitely better than reviewing 1 frame that’s blurry.
The Breathing Trick Revisited
For critical single shots (portraits, macro photography), take a breath in, exhale halfway, hold for a count of two, fire. This gives you a window of maximum stillness without the tension of holding your breath.
Use IBIS + Lens Stabilization Together
On compatible bodies and lenses, turning on both IBIS and lens stabilization simultaneously (rather than choosing one) gives the best results. Check your camera manual — some bodies require this to be enabled specifically.
Shoot RAW
RAW files preserve more image data than JPEGs, giving you far more room to sharpen, recover detail, and reduce noise in post-processing. If sharpening a slightly soft photo in Lightroom or Topaz, you’ll get dramatically better results from a RAW file.
FAQs: How to Fix Shaky Hands Photography
What shutter speed prevents camera shake when shooting handheld?
Use at least 1/(focal length)s. At 50mm, use 1/50s minimum.
Does image stabilization fully replace a tripod?
No. IS helps handheld shooting, but tripods eliminate all camera shake completely.
Can I fix motion blur in post-processing software?
Mild blur can be reduced. Severe blur cannot be fully recovered — prevention is better.
What is IBIS in photography?
In-Body Image Stabilization; the camera sensor physically shifts to counteract hand movement.
Is OIS or EIS better for smartphones?
OIS is better for photos and low light. EIS works well for video stabilization.
How do I stop blurry photos in low light without a tripod?
Increase ISO, use the widest aperture, enable Night Mode, and brace against solid objects.
Does burst mode help with shaky hands photography?
Yes. Multiple frames increase the chance of capturing one perfectly sharp shot.
What is the best app to sharpen blurry photos?
Topaz Photo AI offers the most effective AI-powered blur and shake recovery currently available.
Why are my zoomed-in smartphone photos blurry?
Digital zoom amplifies camera shake. Use optical zoom or move physically closer instead.
Should I breathe in or out when pressing the shutter?
Exhale fully, then press the shutter at the natural pause at the bottom of your breath.
How much does a gimbal help reduce camera shake?
Gimbals eliminate camera shake for video. For stills, they help but proper technique is faster.
Can a camera strap reduce camera shake?
Yes. Wrap around wrist and create tension against the camera for a third stabilization point.
Conclusion: Sharp Photos Are a Skill and You Can Learn It
Camera shake is not a permanent problem. It’s a solvable one.
The good news is that almost every tool, trick, and technique in this guide can be learned and applied immediately — without buying any new gear. Proper hand position, correct breathing, understanding shutter speed, and using the stabilization already built into your camera are all zero-cost improvements that can transform your photography overnight.
Then, as your budget allows, accessories like tripods, monopods, and gimbals give you even more capability. And when all else fails, AI sharpening tools like Topaz Photo AI can rescue images that would otherwise be deleted.
The single most important thing? Practice deliberately. Go out and shoot specifically to practice these techniques. Review your EXIF data after blurry shots to understand what went wrong. Experiment with burst mode, breathing techniques, and bracing positions. Build muscle memory for proper camera hold.
The photographers who consistently produce sharp, professional-quality images aren’t necessarily using the best gear. They’ve simply internalized the habits that eliminate camera shake before they even raise the camera to their eye.
Start today. Your next photo can be sharp.